Static Testing
If you have not done so already, please read the JavaScript Testing Backgrounder in the hybrid activities overview.
Due Date
Due before 6:00 pm on Friday Sept 24, 2021.
# Background
Static testing is the base of the testing trophy. It is all about catching potential errors and ensuring consistent formatting and code quality – while you are writing it. The core goals are:
- Increase readability through consistent code style and formatting
- Catch common mistakes and possible logic errors
- Reduce code complexity
- Catch variable type mismatches
- Reduce security risks
- Ensure that third-party dependencies are updated
In the JavaScript world, there are many tools that try to address one or more of these objectives. Most of these can be configured to run before you make a commit (using git pre-commit hooks (opens new window)), so that you always commit clean code. It is also common to run these checks before you deploy to production with CI/CD processes.
To gain a good basic understanding of how client-side hooks work, read these two pages - Atlassian Git Hooks Tutorial (opens new window) and Digital Ocean Git Hooks Tutorial (opens new window)
Many of these tools integrate directly with your code editor or IDE. For example integrating ESLint (opens new window) with VS Code means that you will get hints about potential errors as you type your code.
Adding JSDoc (opens new window) style code comments will enhance readability of your code, but also enable VS Code to display more accurate type hint messages and alert you to potential mismatches.
The Prettier (opens new window) plugin will automatically format your code on save. It follows an opinionated list of rules for consistent formatting. These rules can be tweaked to work with your preferred style guide. Not only does this vastly improve the readability of your code and guide you in following industry best practices, but if everyone on your team is using the same formatting rules, it will avoid many unnecessary git merge conflicts.
Prettier-Standard
This is my preferred VS Code plugin. It combines the convenience of Prettier and enforces the Standard JS (opens new window) style guide rules.
# Assignment Objective
During this assignment you will install and practice working with each of these tools. Learn them early and use them often to build good habits and ship clean code.
# Tools
- JS Docs
- ES Lint
- Standard JS
- Prettier
# Instructions
# Setup
- create a new project folder called
h1-static-testing - create an
index.htmlfile in the project folder with this content
<!DOCTYPE html>
<html lang="en">
  <head>
    <meta charset="UTF-8" />
    <meta name="viewport" content="width=device-width, initial-scale=1.0" />
    <title>H1 - Static Testing</title>
  </head>
  <body>
    <script src="index.js"></script>
  </body>
</html>
2
3
4
5
6
7
8
9
10
11
- create an
index.jsfile
echo "'use strict'" >> index.js
- add a
.gitignorefile with this content
.DS_Store
node_modules
dist
2
3
- initialize git in the project folder
git init
- initialize NPM in the project folder
npm init --yes
- stage the initial files and make a first git commit
git add -A
git commit -m "initial commit"
2
# Sample JavaScript
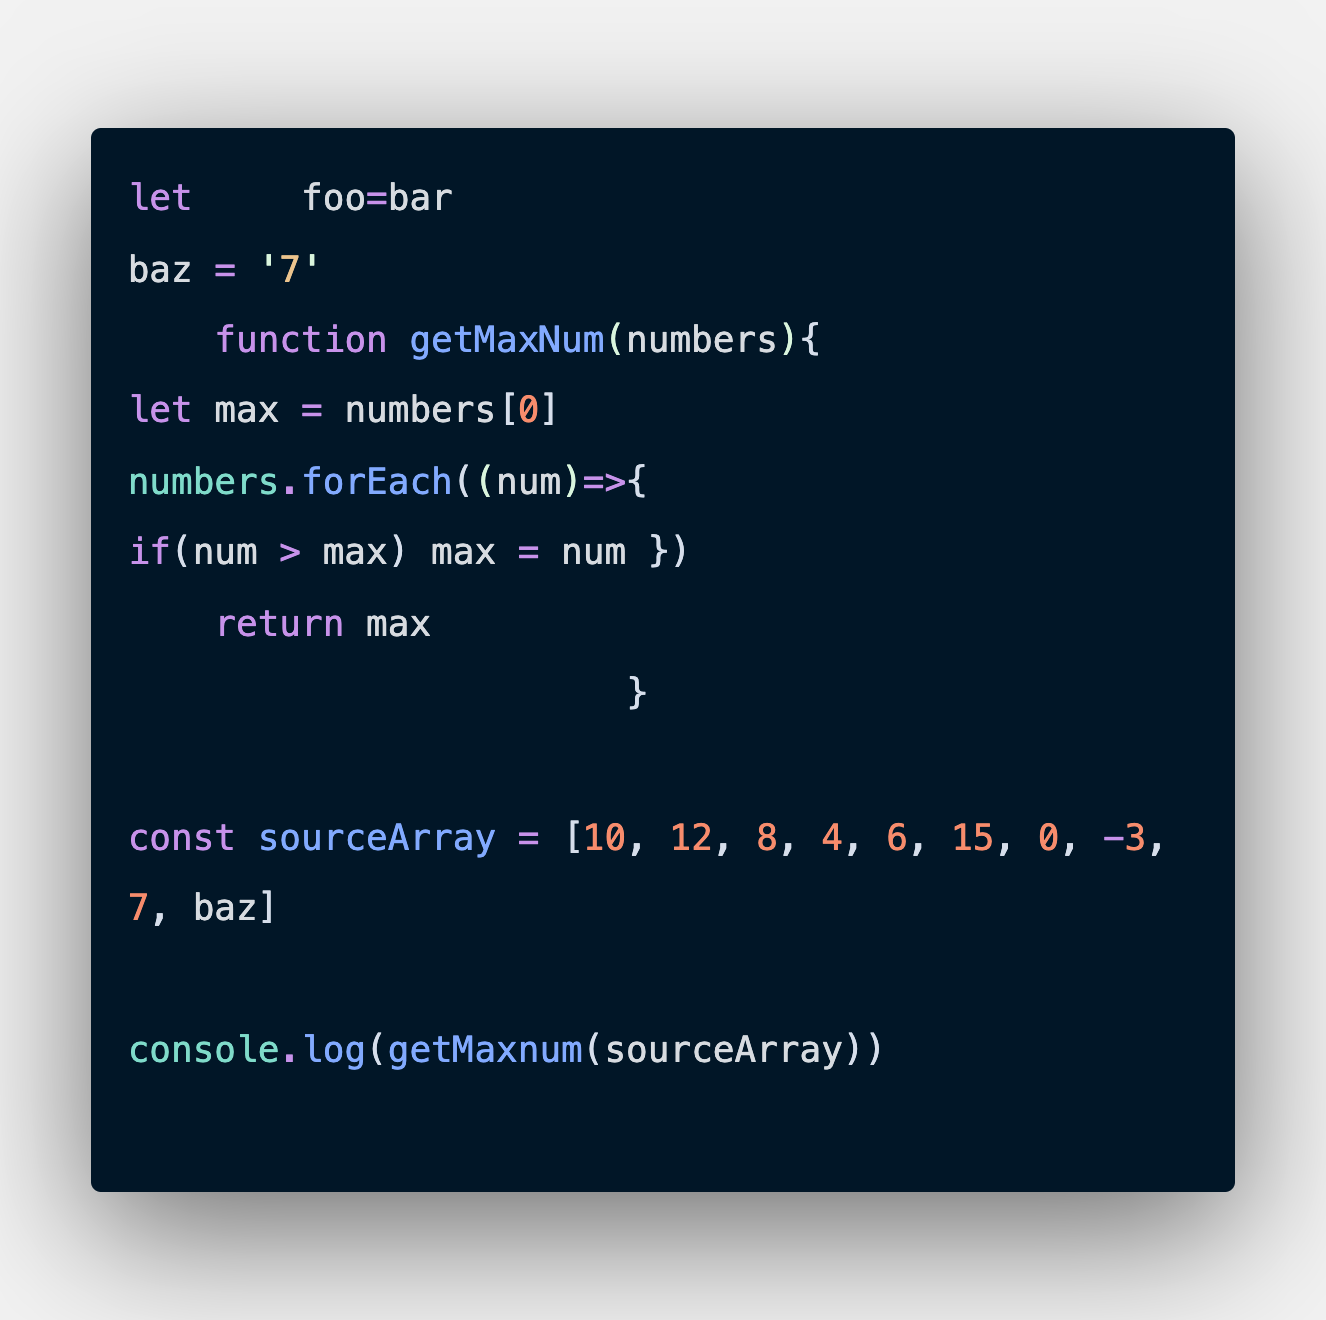
This starting JavaScript file has several common small errors. These errors are a little harder to find because it is not formatted in a consistent manner. Type this code yourself, adding it to the index.js file. Leave any errors that you spot as they are.
# Intro to ESLint
Let's look at how ESLint (opens new window) can help identify these problems. Navigate to the Demo page on the ESLint website. This demonstration tool will let you see how different configurations of ESLint will see your code.
Copy and past the sample code above into the ESLint demo page. It will parse the code and then show a list of potential errors on the right-hand side.
On the first run, it will likely show you 1:9 - Parsing error: Unexpected token foo. This is because the default settings use the ES5 language spec and it doesn't understand let. Click on the Rules Configuration heading to expand the settings panel, and change the ECMA Version to ES2020 and enable the browser environment.
Now you should see a list of 6 probable errors, each with a short description and a link to the full documentation for the related ESLint rule.
If you scroll further down the page, you can see all of the possible rules that you can choose to have ESLint check for you. Once you have chosen all the rules that you want to consistently apply in your project, you can click the purple download link at the bottom of the page to save the configuration in an .eslintrc.json file.
We could use that configuration file to run ESLint right in your project folder.
# Install ESLint
ESLint is highly configurable, and has an overwhelming number of plugins. It is now a recommended best practice to use ESLint to catch language rule bugs, but not to enforce styling. We will use another tool for that.
OK, add ESLint to your project folder as a development dependency.
Do not install ESLint globally
The plugins and configuration rules will often be different from project to project. So, it is recommended that you install ESLint locally on a per project basis.
npm install eslint --save-dev
Now initialize the configuration file. Remember that npx can load a node package into memory and run it. If you have it installed in node_modules, then that version will be used. If it is not installed locally then npx will download the package into memory and run it, without actually adding it to node_modules.
npx eslint --init
This will ask you several configuration questions. Use the following answers.
| Question | Choice |
|---|---|
| How you want to use ESLint? | To check syntax and find problems |
| What type of modules does your project use? | JavaScript modules (import/export) |
| TypeScript? | No |
| Where does your code run? | Browser and Node |
| Format for config file? | JSON |
This will generate a new .eslintrc.json configuration file at the top level of your project.
{
  "env": {
    "browser": true,
    "es2021": true,
    "node": true
  },
  "extends": "eslint:recommended",
  "parserOptions": {
    "ecmaVersion": 12,
    "sourceType": "module"
  },
  "rules": {}
}
2
3
4
5
6
7
8
9
10
11
12
13
Notice that the rules object above is empty. This configuration is setup to follow a pre-packaged set of rules called eslint:recommended. There are many similar rule sets depending on the type of project that you are working on, e.g. plugin:react/recommended - we don't need this for today.
Using npx, you can now run ESLint to check the sample file.
npx eslint index.js
You should see output similar to this.
/Users/rlm/Code/algonquin/mad9135/f20/02-hybrid/01-static-testing/index.js
   3:11  error  'foo' is assigned a value but never used  no-unused-vars
   3:15  error  'bar' is not defined                      no-undef
   4:1   error  'baz' is not defined                      no-undef
   5:16  error  'getMaxNum' is defined but never used     no-unused-vars
  12:53  error  'baz' is not defined                      no-undef
  14:13  error  'getMaxnum' is not defined                no-undef

✖ 6 problems (6 errors, 0 warnings)
2
3
4
5
6
7
8
9
10
This is very informative, but it would be a little inconvenient if we had to manually check all of our files every time we make a change. Fortunately, there are a couple more pieces to this puzzle.
# Install ESLint extension for VS Code
Go to the extensions tab in VS Code and search for eslint. The first one on the list is likely the one you are looking for - author, Dirk Baeumer. It has over 10 million downloads.
Once this extension is installed and enabled, go back and look at the index.js file. It should now have red squiggly underlines for the places that ESLint has found probable errors. Cool! Now you can see potential issues right away while you are creating your code instead of finding them the hard way when your app crashes.
You can review and fix these errors two ways:
Hover the cursor over the red squiggles and VS Code will pop-up an information box that has the same ESLint message that you saw in the terminal.
Open the "problems" tab of the bottom panel (where the embedded terminal is displayed). It will show the full list of ESLint errors.
TASK 1
Take a screen shot of VS Code showing the index.js file with both the inline red squiggles and the "problems" list in the bottom panel.
# Prettier and Standard JS
Fixing the problems highlighted by ESLint would be a lot easier if the code followed a standard formatting style guide. Fortunately, this is a pretty easy fix.
# Style Guides
Every team you work with will likely have their own preferred JavaScript style guide (opens new window) to follow. By using auto-formatting tools, you don't have to worry about remembering all of the rules for any given project.
If you are working on your own projects, there are many ready made "rule sets" that you can adopt:
- Google (opens new window)
- Airbnb (opens new window)
- Netflix (opens new window)
- Standard JS (opens new window)
Both Airbnb and Standard JS are great. Standard JS is used by companies like node.js, NPM, GitHub, Express, mongoDB, and many many more. Kent C Dodds and lots of other well-known companies use Airbnb.
# Prettier
In the last few years, Prettier (opens new window) has become the defacto standard tool for auto formatting web app code (JavaScript, JSX, TypeScript, CSS, Less, SCSS, HTML, etc.). It is an opinionated code formatter, with few configurable options, and has plugins for the most commonly used code editors.
Once installed, it will automatically format your code every time you hit [save] and that will be one less silly thing to distract your team during code reviews.
The OSS project prettier-standard (opens new window) combines the goodness of Prettier with the Standard JS rules.
# Install prettier-standard
npm install --save-dev prettier-standard
You can now run it to clean up that messy index.js file.
npx prettier-standard --format
It can also run the ESLint rules after formatting, by using the --lint flag.
npx prettier-standard --lint
Of course, you would really rather that all of this happened automatically in VS Code. So ...
TASK 2 - INSTALL Prettier-Standard
Install the VS Code Extension for Prettier-Standard (opens new window).
Make sure that the VS Code setting editor.formatOnSave is enabled.
Take a screenshot showing the extension is installed and enabled.
# Clean up those linting errors
Now that the code has been formatted and is more readable, it is time to fix those linter errors.
Line 15 has a typo in the name of the function. Fixing that also clears the warning about the function
getMaxNumbeing defined but never called.baris not properly declared. Addlet baron line 2.There are two warnings about
baznot being defined. It is spelled wrong. Changebaztobaron lines 4 and 13.foois assigned but never uses. You can delete line 3.baris never reassigned, so redeclare it withconstinstead ofletand combine the assignment ...const bar = '7'
The cleaned up code should now look like this.
'use strict';

const bar = '7';

function getMaxNum(numbers) {
  let max = numbers[0];
  numbers.forEach((num) => {
    if (num > max) max = num;
  });
  return max;
}

const sourceArray = [10, 12, 8, 4, 6, 15, 0, -3, 7, bar];

console.log(getMaxNum(sourceArray));
2
3
4
5
6
7
8
9
10
11
12
13
14
15
# Type checking with JSDoc
JSDoc (opens new window) is a standard for annotating your JavaScript code with comment blocks - sometimes called "doc blocks". Using standardized block tags like @param (opens new window) for function parameters and @returns (opens new window) for return values, yields significant benefits:
- Improves readability of the code
- Enables static type checking in VS Code
- Enables the automatic generation of a documentation website
Update the earlier code example, index.js with a doc block for the getMaxNum function.
/**
 * Find the highest value in an array of integers
 * @param {number[]} numbers
 * @returns {number} Maximum value
 */
function getMaxNum(numbers) {
  let max = numbers[0];
  numbers.forEach((num) => {
    if (num > max) max = num;
  });
  return max;
}
2
3
4
5
6
7
8
9
10
11
12
Now hover over the call to the function in the last line of the script — VS Code pops up an intellisense code usage hint for your custom function.
Add a @type (opens new window) comment above the declaration of the sourceArray to remind your future self that this variable should hold an array of numbers.
/** @type {number[]} Values should be integers */
const sourceArray = [10, 12, 8, 4, 6, 15, 0, -3, 7, bar];
2
This is already very helpful, but it can be even better!
One extra comment tag - //@ts-check - at the top of the file will tell VS Code to use the built-in TypeScript compiler + the JSDoc annotations to flag potential type mismatches.
You should now see a red squiggly line under the variable bar in the sourceArray. Hover over it and see VS Code is warning that ...
const bar: "7"
--------------
Type 'string' is not assignable to type 'number'.
2
3
This is huge! Catching this kind of error while writing your code will save you endless hours of debugging a misbehaving application with runtime errors.
TASK 3 - Add doc blocks
Add the relevant JSDoc comments to this example module, including a @module block with @example usage instructions. Assume that a user object includes: firstName, lastName, email, password, and lastLoginDate.
Submit the annotated code.
const baseURL = 'https://madd.app/api/v1/';
const apiKey = process.env.MADD_API_KEY;

async function fetchData(resource, method = 'GET', payload) {
  try {
    const response = await fetch(`${baseURL}${resource}`, {
      method,
      headers: {
        'Content-Type': 'application/json',
        'X-MADD-API-KEY': apiKey,
      },
      body: JSON.stringify(payload),
    });

    if (!response.ok) throw Error(response.statusText);

    return response.json();
  } catch (error) {
    return Promise.reject(new Error('Problem connecting to server'));
  }
}

export async function getAllUsers(filters) {
  let resourceURL = '/users/';

  // TODO: extract filter criteria from filters object and
  //       construct the querystring params.
  resourceURL += '';
  return fetchData(resourceURL);
}

export async function getUserById(id) {
  return fetchData(`/users/${id}`);
}

export async function createUser(user) {
  return fetchData('/users', 'POST', user);
}

export async function updateUser(user) {
  return fetchData(`/users/${user.id}`, 'PATCH', user);
}

export async function deleteUser(user) {
  return fetchData(`/users/${user.id}`, 'DELETE', user);
}
2
3
4
5
6
7
8
9
10
11
12
13
14
15
16
17
18
19
20
21
22
23
24
25
26
27
28
29
30
31
32
33
34
35
36
37
38
39
40
41
42
43
44
45
46
# Submission
Please submit all three files from the above tasks in a single ZIP file on Brightspace.