React Native
# React Native Working with Data
Working with data in React Native is largely the same as it was with React or NextJS. We can use fetch() to upload and download data from an API. We can also use the hooks useState(),
userEffect() and useRef() to monitor objects, state, and data.
On mobile devices with React Native we do not have localStorage or sessionStorage. Instead we can install the AsyncStorage and SecureStorage packages.
Working with files will be different too, since we don't have the Web Cache API. We actually interact with the internal storage and external storage on the device. There are several packages that we
will install to manage this.
# Review useState
In React Native, just like in React, we can create state variables that will be monitored, and when updated, will update the interface.
import { useState } from 'react';
//NOT from react-native
import { View, Pressable, Text } from 'react-native';

export default function MyComponent(props) {
  const [myValue, setMyValue] = useState('inital value');

  return (
    <View style={styles.container}>
      <Pressable
        onPress={() => {
          let str = crypto.randomUUID();
          setMyValue(str);
          //update the value of `myValue` with each tap
          //which will re-render the Text Component
        }}
      >
        <Text style={styles.txt}>The value of myValue is {myValue}</Text>
      </Pressable>
    </View>
  );
}
2
3
4
5
6
7
8
9
10
11
12
13
14
15
16
17
18
19
20
21
22
Every time you call the set method connected to the state variable, every component that uses the state variable will be re-rendered.
useState reference (opens new window)
# Review useEffect
The useEffect hook gives us a way to manage state values by using other events, effects, and transactions as the trigger for changing the state values.
The signature for the useEffect hook is `useEffect(callback, [array, of, dependencies]);
import { useEffect, useState } from 'react'; //not react-native

export default function MyComponent(props) {
  const [myValue, setMyValue] = useState('inital value');

  useEffect(() => {
    //the code here runs EVERY time the screen is rendered
  });

  useEffect(() => {
    //the code here runs only on the FIRST render
    //useful for initial data gathering
  }, []);

  useEffect(() => {
    //the code here runs only when the variable x changes
  }, [x]);
}
2
3
4
5
6
7
8
9
10
11
12
13
14
15
16
17
18
Regardless of which of the three versions of useEffect that you are calling, the callback function being passed to the useEffect() method can return a cleanup function.
The purpose of a clean up function is clear out any data or event loop functionality that will no longer be needed because the component is being removed from the UI.
export default function MyComponent(props){
  const [mydata, setMydata] = useState([]);

useEffect(async ()=>{
  //do something that will keep running and using resources
  let timmy = setInterval(()=>{
    //once per minute fetch new data
    fetch(url)
      .then((resp)=>resp.json())
      .then((data)=>setMydata(data))
      .catch(err=>console.error(err.message));

  }, 60000);
  //return a cleanup function
  return function(){
    //a closure is created around `timmy` so it can be accessed later
    clearInterval(timmy);
    //this will be called when `MyComponent` is removed from the UI
  }
}, [])
2
3
4
5
6
7
8
9
10
11
12
13
14
15
16
17
18
19
20
useEffect reference (opens new window)
# Review useRef
The useRef hook is used to create a reference to a value that will be remembered when a component gets re-rendered. A ref can be a reference to a UI element, which was the original intent in old
versions of React, but with the addition of the hook useRef it became capable of holding any value or object in a safe way that will exist over multiple re-renders of your component.
import { useRef, useState } from 'react';

export default function MyComponent(props) {
  const myVal = useRef('initial value');
  const [strLen, setStrLen] = useState(() => {
    return myVal.current.length;
  });

  return (
    <View>
      <Pressable
        onPress={() => {
          let str = crypto.randomUUID();
          myVal.current = str; //this updates the value inside the ref
          setMyValue(str.length); //this updates the state value and triggers a rerender.
        }}
      >
        <Text>The length of the favourite string is {strLen}</Text>
      </Pressable>
    </View>
  );
}
2
3
4
5
6
7
8
9
10
11
12
13
14
15
16
17
18
19
20
21
22
The difference in use, between a state value and a ref value, is that changing a ref will not cause the UI to re-render. If you want the UI to update then you should pass the update to a state
value too.
To access or update the value of a ref object, you MUST go through the current property.
useRef reference (opens new window)
# Passing Props between Components
As you build your React Native application, there will frequently be times where one component will load or access some data, but another child component needs access to some or all of that data.
The way that this is handled in React as well as React Native is through passing props.
When one component loads another, there is an opportunity to create a prop and pass something. Here is a simple example where we are loading a custom component called <MyCoolComponent> into a
<View>. MyCoolComponent could be in the same .js file or it could be imported from another file. There are three attributes written here: info, other, and someMethod. The first has a numeric
value, the second has a variable which could hold anything, and the third is a reference to a function.
export default function SomeComponent() {
  function myFunc() {
    console.log('this is some function');
  }

  return (
    <View>
      <MyCoolComponent info={123} other={someVar} someMethod={myFunc}>
        Some text inside of Cool Component.
      </MyCoolComponent>
    </View>
  );
}
2
3
4
5
6
7
8
9
10
11
12
13
Then inside of MyCoolComponent we will have and object, that is called props by convention. props is an object that will contain all the attributes that are added plus a special one called
children. The children property will be all the text and components that are written between the opening and closing tags for the component.
function MyCoolComponent(props) {
  let num = props.info;
  let obj = props.other;
  let aFunction = props.someMethod;
  //aFunction is a reference to the myFunc function that was created inside SomeComponent.
  aFunction();

  //props.children will be the text "Some text inside of Cool Component."
  return <Text>{props.children}</Text>;
}
2
3
4
5
6
7
8
9
10
Now, instead of typing props again and again, we can destructure the props object inside the function declaration to access the exact properties we need.
function MyCoolComponent({ info, other, someMethod, children }) {
  /*
  in here we have access to the variables `info`, `other`, `someMethod`, and `children`
  */
}
2
3
4
5
# FlatList and Props
So, here is a practical example of passing props where we can pass a method for editing a state variable from the screen component into a ListItem component.
import { useState } from 'react';
import { FlatList, View, Text, Pressable } from 'react-native';

const userlist = []; //array of user objects coming from somewhere

export default function MyListScreen(props) {
  const [users, setUsers] = useState(userList);

  function removeUser(user_id) {
    //remove the user with the matching uid
    let newusers = users.filter((user) => user.uid !== user_id);
    setUsers(newusers);
  }

  return (
    <View>
      <FlatList data={users} renderItem={({ item }) => <ListItem user={item} remove={removeUser} />}></FlatList>
    </View>
  );
}

function ListItem({ user, remove }) {
  //build the list item to be loaded by FlatList renderItem
  //this could be built on a different page...
  //user is the user object from the users array
  //remove is a reference to the removeUser function inside of MyListScreen

  return (
    <View key={user.uid}>
      <Pressable
        onPress={() => {
          remove(user.uid);
        }}
      >
        <Text>{user.username}</Text>
      </Pressable>
    </View>
  );
}
2
3
4
5
6
7
8
9
10
11
12
13
14
15
16
17
18
19
20
21
22
23
24
25
26
27
28
29
30
31
32
33
34
35
36
37
38
39
The <Pressable> component has its onPress attribute which contains a method that will be called when the user taps on a <ListItem>. It will call the remove function and pass the current
user.uid to the function. This means that it is calling the removeUser function from inside the MyListScreen component.
# React Native Fetch
When fetching data from an API in React Native, since we are working with JavaScript, we can use the built-in fetch call that uses the URL, Request, Response and Body objects.
It can be run with the async await approach that needs to be wrapped in a try...catch block or you can use the Promise.then().then().catch() chain.
//then chain
function getData(url){
  fetch(url)
    .then(resp=>{
      if(!resp.ok) throw new Error(resp.statusText);
      return resp.json();
    })
    .then(jsonObj=>{
      console.log(jsonObj.response)
    })
    .catch(err){
      //display err.message for user
    }
}

//with async
async function getData(url){
  try{
    const resp = await fetch(url);
    if(!resp.ok) throw new Error(resp.statusText);
    const jsonObj = await resp.json();
    console.log(jsonObj.response)
  }catch(err){
    //display err.message details to user
  }
}
2
3
4
5
6
7
8
9
10
11
12
13
14
15
16
17
18
19
20
21
22
23
24
25
26
This video is long but contains everything you need to know about Fetch and the associated JS objects and methods.
Everything you need to know about Fetch
# Axios
If you want, you can also import and use the Axios JS library to make your fetch calls.
Axios library website (opens new window)
The primary practical difference between using Fetch and using Axios is that it does the error handling for your request automatically, and it also does the conversion of the JSON data into a JS Object for you too.
Once you have installed and imported axios into your page, you can use one of its built-in methods get(), post(), and a then() chain like this:
//use .get() to retrieve/read data from your API.
axios
  .get('/user?ID=12345')
  .then(function (response) {
    // handle success
    console.log(response);
  })
  .catch(function (error) {
    // handle error
    console.log(error);
  });

//use post to upload data to create a record in your api
axios
  .post('/user', {
    firstName: 'Tony',
    lastName: 'Davidson',
  },
  headers: {
    'Content-Type': 'application/json'
  })
  .then(function (response) {
    console.log(response);
  })
  .catch(function (error) {
    console.log(error);
  });
2
3
4
5
6
7
8
9
10
11
12
13
14
15
16
17
18
19
20
21
22
23
24
25
26
27
To add it to your project as a dependency, run the npm install.
npm install axios
Here is a list of all the API methods from Axios (opens new window)
# AsyncStorage and SecureStore
The AsyncStorage and SecureStore APIs are both ways that you can save information in a manner similar to LocalStorage in the browser. The main difference between them is that the SecureStore
version will encrypt the data.
This section will be focused on the AsyncStorage API.
Start with the install. Here is the official guide (opens new window)
expo install @react-native-async-storage/async-storage
On your screen / component, import the module.
import AsyncStorage from '@react-native-async-storage/async-storage';
As the name implies, this is an asynchronous way of saving data. All the methods are async ones. So, think Promises or async await. Here are sample functions to use when saving or reading some data.
//a function to save data
const storeData = async (value) => {
  try {
    value = JSON.stringify(value);
    //for objects use the JSON.stringify method
    //you can skip this method if you are just saving a string
    await AsyncStorage.setItem('my_storage_key', value);
  } catch (e) {
    // saving error
  }
};

const getData = async () => {
  try {
    const jsonValue = await AsyncStorage.getItem('my_storage_key');
    return jsonValue != null ? JSON.parse(jsonValue) : null;
  } catch (e) {
    // error reading value
  }
};
2
3
4
5
6
7
8
9
10
11
12
13
14
15
16
17
18
19
20
The my_storage_key should be replaced with a unique name that you choose for use in your App. This is just like using a unique name in the browser for your localstorage. The key is a string.
The value you save can be anything you could store with JSON.
It works the same way as localStorage when you want to change the value. Retrieve the value into a local variable, edit that variable, and then overwrite the old value in AsyncStorage. The editing
takes place in the app. We only read or replace what was in AsyncStorage.
The API section of the docs (opens new window) has references for the other methods: removeItem, mergeItem, getAllKeys, clear, multiGet,
multiSet, multiMerge, and the hook useAsyncStorage.
In the demo sample the useAsyncStorage method is being used. You can see the working demo in the react native demo repo (opens new window) open the App.js file and
switch to the asyncstore branch.
# SecureStore
Here is the link to the SecureStore reference (opens new window). This is the secure version of AsyncStorage. It encrypts the key-value pairs before they are stored on the device.
First, you add the package to your project.
npx expo install expo-secure-store
Then you need to add a permission to your app.json config file.
{
  "expo": {
    "ios": {
      "config": {
        "usesNonExemptEncryption": false
      }
      ...
    }
  }
}
2
3
4
5
6
7
8
9
10
To use it, you need to import the module and then use the single method to save or second to retrieve.
import * as SecureStore from 'expo-secure-store';

async function save(key, value) {
  await SecureStore.setItemAsync(key, value);
}

async function getValueFor(key) {
  let result = await SecureStore.getItemAsync(key);
}
2
3
4
5
6
7
8
9
When you use the setItemAsync method there is a third options parameter, where you can add an object that sets some options.
See here for the options (opens new window).
The object that you are most likely to use in the options parameter is {requireAuthentication: true}. This will get the user to authenticate themselves on the phone when saving or retrieving data.
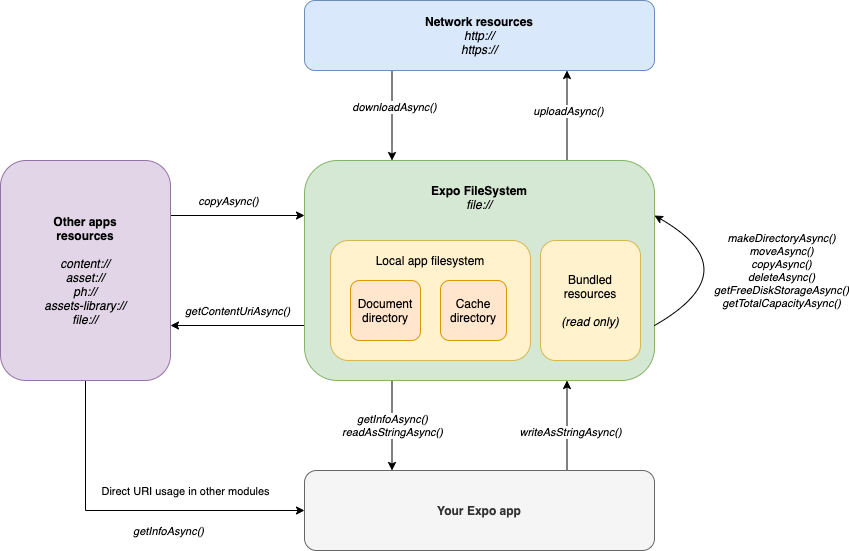
# FileSystem
The FileSystem API lets you access the files stored on the device as well as network resources. It can use http://, https://, file://, content://, asset://, assets-library://, and
ph:// to load, copy, read, delete, and write to files and folders.
The filesystem guide (opens new window) has a great diagram showing the different parts of the app and filesystem and which methods are used to access different assets via different protocols.
You will need to install the module from expo.
expo install expo-file-system
Then, for Android, add to the app.json, inside the "android" section.
{
  "permissions": ["READ_EXTERNAL_STORAGE", "WRITE_EXTERNAL_STORAGE", "INTERNET"]
}
2
3
For iOS, no extra permissions need to be added to "infoPList".
See the ImagePicker section in Week 5 for notes about permissions to use with the ImagePicker in app.json for the demo.
Then import the FileSystem object.
import * as FileSystem from 'expo-file-system';
The FileSystem API has access to two places - FileSystem.cacheDirectory and FileSystem.documentDirectory. The cache location is where things like the Camera and ImagePicker save things. The
document location is where you can permanently save files. Both locations use the file:// URI.
When you are working with files, remember that the methods are all async so you need to handle them accordingly - with await plus try{ }catch(){} or .then().catch().
Files in the cache will often be the ones created by other APIS. The document directory lets you create your own folders and save files with names that you choose.
If you want to get meta info about a file use the FileSystem.getInfoAsync(fileURI, {size:true}) method. It will return a Promise that resolves to { exists: false, isDirectory: false } or an object
like this:
{
    exists: true,
    isDirectory: false,
    modificationTime: timeStampInSeconds,
    size: inBytes,
    uri: 'file://.....',
}
2
3
4
5
6
7
When working with text files, you will want to read and write the contents of the file with FileSystem.readAsStringAsync(fileURI) and FileSystem.writeAsStringAsync(fileURI, contents). It returns a
Promise that resolves to the contents from the file.
General file operations like, moving, copying, and deleting a file are handled with FileSystem.moveAsync({from:oldURI, to:newURI}), FileSystem.copyAsync({from:oldURI, to:newURI}), and
FileSystem.deleteAsync(fileURI).
To create a new directory, use FileSystem.makeDirectoryAsync(fileURI, {intermediates:true}). The intermediates property lets you indicate if you want non-existant directories in the fileURI to be
created too.
To read the contents of a directory, use FileSystem.readDirectoryAsync(fileURI). It returns an array of uri string file or directory names.
# Downloading and Uploading Files
If you want to download a file and save it locally, as opposed to just loading and displaying something like a browser does, then we can actually measure the progress of the download.
Here is a sample for downloading a file.
FileSystem.downloadAsync('http://techslides.com/demos/sample-videos/small.mp4', FileSystem.documentDirectory + 'small.mp4')
  .then(({ uri, status, headers }) => {
    console.log('Finished downloading to ', uri);
    console.log('HTTP status', status);
    //headers is a headers object with the key value pairs
  })
  .catch((error) => {
    console.error(error);
  });
2
3
4
5
6
7
8
9
If you want to monitor the progress of a download then you need to use the FileSystem.createDownloadResumable() method which creates a wrapper around the download request and has its own
downloadAsync method. To see a full example with the progress being measured see this sample (opens new window)
To do an upload, use FileSystem.uploadAsync(url, fileURI, {headers:{}, httpMethod:'POST', uploadType:FileSystemUploadType.BINARY_CONTENT || MULTIPART}).
Read more about the options here (opens new window).
# More about URIs
The file:// protocol is what gets used internally for all the Expo APIs. If you need a URI that uses content:// so that it can be accessed by other applications then you can use the
FileSystem.getContentUriAsync(fileURI) method to do the conversion.
# Free Space
If you need to know how much free space is available on the device you can use the FileSystem.getFreeDiskStorageAsync() method.
You can find a simple demo using the FileSystem AND ImagePicker plus the camera APIs in the react native demo repo (opens new window) open the App.js file and
switch to the filesystem branch. The app lets you pick something from the camera roll, or take a picture to display on the page. Each time you pick an image or take a picture it gets saved to a
permanent location and overwrites the previous file there. The next time the app runs it will check for and display the image if it exists.