11.2 Navigation and Passing Data
# Setup for Navigation
Navigation in a Flutter app is achieved in a similar way to a browser by having an Array of screens that have been shown. As the user navigates, we add Screens to this Array and if they go back
through the history of screen shown, we remove Screens from the Array. This Array is called the navigation Stack.
The best way to organize the main navigation for your project is to create a screens folder inside your /lib folder. All your screens will become .dart files inside this folder. Each screen will
have its own .dart file with a single StatelessWidget or StatefulWidget class.
We will import each of those files into the main.dart file where could we define the different routes that the main navigation will be using.
It is always possible to import one of your screen .dart files into any other file and use a Navigator object to navigate to that screen too.
When you work with React Native navigation later on, you will see the same concept of a Stack of screens.
# BottomNavigationBars
The BottomNavigationBar widget has an items parameter that will hold a List of BottomNavigationBarItem widgets. Each of those needs an icon and a label property.
The onTap property has a listener function that accepts (int index) so that you can target the appropriate named route depending on which item was tapped.
Being able to style the current item requires a StatefulWidget which we will discuss in class.
Widget build(BuildContext context) {
int current = 0; //the state variable
return BottomNavigationBar(
selectedItemColor: Colors.amber,
currentIndex: current, //needs stateful widget to update this value
items: const [
BottomNavigationBarItem(
icon: Icon(Icons.home),
label: 'Home',
),
BottomNavigationBarItem(
icon: Icon(Icons.star),
label: 'One',
),
BottomNavigationBarItem(
icon: Icon(Icons.share),
label: 'Two',
),
],
onTap: (int index) {
//what to do when they click
//onTap function will be passed the index of the tapped BarItem
switch (index) {
case 0:
Navigator.of(context).pushNamed('/');
break;
case 1:
Navigator.of(context).pushNamed('/one');
break;
case 2:
Navigator.of(context).pushNamed('/two');
break;
}
}
);
}
2
3
4
5
6
7
8
9
10
11
12
13
14
15
16
17
18
19
20
21
22
23
24
25
26
27
28
29
30
31
32
33
34
35
36
37
38
# NavigationBar and Material Design 3
The recent release of Material Design 3 coincided fairly well with the release of Dart v3 and Flutter v3. With Flutter versions 3.0 - 3.15 Material Design 2 was the default Theming unless you changed the setting in the global theme.
Widget build (BuildContext context){
return MaterialApp(
theme: ThemeData(
useMaterial3: true,
)
);
}
2
3
4
5
6
7
8
As of version 3.16 of Flutter, Material Design 3 is the default. The useMaterial3 setting is only needed if you want it to be false and force Material Design 2 to be applied.
With Material Design 3 there is a new value for the Scaffold( bottomNavigationBar: ) property - the NavigationBar() widget. It works in much the same way as the older BottomNavigationBar().
Instead of BottomNavigationBarItem widgets, it uses NavigationDestination widgets.
Scaffold(
  appBar: AppBar(),
  home: HomePage(), // a default page. just a place holder.
  bottomNavigationBar: NavigationBar(
    destinations: [
      NavigationDestination(icon: Icon(Icons.home), label: 'One'),
      NavigationDestination(icon: Icon(Icons.apple), label: 'Two'),
      NavigationDestination(icon: Icon(Icons.android), label: 'Three'),
    ],
    selectedIndex: pageIndex, //the state variable for the current destination/page
    onDestinationSelected: (int index) {
      setState((){
        pageIndex = index;
        //update the state variable for the current destination/page
      })
    }
  )
)
2
3
4
5
6
7
8
9
10
11
12
13
14
15
16
17
18
When the user taps on one of the navigation items in the bar, then a function gets called and the integer index number, which is the position in the menu, gets passed to the function.
That number can be used to reference for an array of widgets (also a state variable). Eg:
List<Widget> pages = [
  HomePage(),
  PageTwo(),
  PageThree(),
]
2
3
4
5
Then the value of the Scaffold( home: ) propety can be something like pages[pageIndex].
Alternatively, you can create a Map of Routes inside the MaterialApp widget and then use the index from the NavigationBar to decide which route to navigate to like this -
Navigator.of(context).pushNamed('/two').
The routes that you define in the MaterialApp widget look like this:
Widget build(BuildContext context){
return MaterialApp(
theme: ThemeData(...),
home: HomePage(), //default page route
routes: <String, WidgetBuilder> {
'/home': HomePage(),
'/two': PageTwo(),
'/three': PageThree(),
}
);
}
2
3
4
5
6
7
8
9
10
11
12
See further down the page for more information about the Navigator object.
Navigator pushNamed
It is important to be aware that the pushNamed method will replace the entire value of the MaterialApp( home: ) property. Whatever widget you have set as the home will be replaced with the newly
defined route. So, plan the structure of your app accordingly.
# Drawer Navigation
A Drawer is a menu that slides out from the side of the screen and displays a title plus a list of links. To create one, first add the drawer: Drawer() to the Scaffold in each of your screen
.dart files.
As a best practice the Drawer is going to be put it into its own file, and the shared widget as the value for the drawer property. If you want to open a drawer from the right side instead of the
left, then use the endDrawer property instead of the drawer.
Here is a sample Drawer file. We are calling our class MenuDrawer so back in the screen .dart files we will have the line drawer: MenuDrawer() plus an import at the top for the menu file.
// /lib/shared/menu_drawer.dart
import 'package:flutter/material.dart';
import '../screens/home_screen.dart'; //import all the screens that we will link
import '../screens/one_screen.dart';
import '../screens/two_screen.dart';
class MenuDrawer extends StatelessWidget {
//use a StatelessWidget because we don't update any values in the menu
const MenuDrawer({Key? key}) : super(key: key);
//When the MenuDrawer widget is turned into an Element
//the build method gets called and the context is passed in.
//This means that the
Widget build(BuildContext context) {
return Drawer(
child: ListView(
children: buildMenuItems(context),
//we call buildMenuItems which returns a List of <Widget>s
//a DrawerHeader and then 3 ListTile widgets
) // end of ListView
); // end of Drawer
}
//create a method called buildMenuItems
//it will accept a BuildContext object called context
//context is basically where the Widget will be built
//it will return a List of <Widget>s
List<Widget> buildMenuItems(BuildContext context) {
final List<String> menuTitles = ['Home', 'One', 'Two'];
List<Widget> menuItems = [];
//menuItems is not final because we are going to change it
menuItems.add(
const DrawerHeader(
decoration: BoxDecoration(
color: Colors.red,
),
child: Text('Got any more of them links',
style: TextStyle(color: Colors.white, fontSize: 28)
) // end of Text
) // end of DrawerHeader
); // end of menuItems.add() method
//handleItem is a function to be called for each of the menuTitles
handleItem(String element) {
Widget screen = SafeArea();
//use whatever the screens return as your default value.
menuItems.add(
ListTile(
title: Text(element, style: const TextStyle(fontSize: 18)),
onTap: () {
//depending on which menuTitle string is passed in
switch (element) {
case 'Home':
screen = const HomeScreen();
break;
case 'One':
screen = const OneScreen();
break;
case 'Two':
screen = const TwoScreen();
break;
}
//We have now selected a matching screen to load.
//MaterialPageRoute has a builder property which takes a function
// that will be given a context and returns the build function
// for one of our Screens.
Navigator.of(context).pop();
//By calling the pop method BEFORE navigating we are removing the
// Drawer from the history Stack
Navigator.of(context).push(
MaterialPageRoute(builder: (context) => screen)
);
}
)
);
}
//now add the menuTitles List as the menu items
menuTitles.forEach(handleItem);
return menuItems;
}
}
2
3
4
5
6
7
8
9
10
11
12
13
14
15
16
17
18
19
20
21
22
23
24
25
26
27
28
29
30
31
32
33
34
35
36
37
38
39
40
41
42
43
44
45
46
47
48
49
50
51
52
53
54
55
56
57
58
59
60
61
62
63
64
65
66
67
68
69
70
71
72
73
74
75
76
77
78
79
80
81
82
83
84
85
# Navigator and MaterialPageRoute
For us to create navigation between our screens, we need the Navigator class from Widgets (opens new window) (This is different from the Navigator class
from Dart), and the MaterialPageRoute class (opens new window).
The Navigator does the management of the Stack of screens. The MaterialPageRoute class applies platform adaptive transitions to move between the screens. On Android the new screen slides and fades
in from the bottom. On iOS is slides in from the right and pushes the old screen to the left. Both platforms reverse the transitions when moving back through the Navigation Stack.
There are three primary methods that we will use with the Navigator object.
Navigator.of(context).push( MaterialPageRoute( builder: (context) => SomeScreen() ))Navigator.pushNamed(context, routeName, arguments: {})Navigator.pop(context)
Also worth noting is the pushReplacementNamed method which is analogous to the JavaScript History.replaceState method.
Navigator.pushReplacementNamed(context, routeName, arguments: {})
The Navigator class has a static method of() which returns the NavigatorState object that has the pop and push methods. All the push* methods accept a Route object. The Route object will be
passed a RouteSettings object, which includes an arguments property and a name property.
Navigator.of(context).push(
  MaterialPageRoute(
    builder: (context) => SomeScreen(),
    maintainState: true,
    //default value. If set to false old state values are removed
    // from memory when switching to a new screen.
  )
)
2
3
4
5
6
7
8
NavigatorState reference (opens new window)
Route reference (opens new window)
RouteSettings reference (opens new window)
Drawer Back Button Issue
One important note about having a Drawer and a Back button.
A Drawer is added to the Stack of screens when the user opens it.
So, each time you navigate from the Stack make sure that you use this - Navigator.of(context).pop(); - before your call your push method.
# Routes, InitialRoute, Named Routes
For our main navigation in either a BottomNavigationBar or a Drawer we can import a .dart screen file call the push method on the Navigator object to add a screen to the navigation Stack
and have it be rendered on the screen.
That approach works fine if you only have a couple of routes but is harder to edit in the future. A better approach for your main navigation is the creation of named routes. Inside our MaterialApp
widget in our main.dart file we will replace the home property with a routes property PLUS an initialRoute property.
The routes property gets a Map with key value pairs. The keys are string to identify a route. The values are functions that accept the context and return a Screen widget. With the named routes
defined we can now use Navigator.pushNamed(context, routeName) in the Drawer or the BottomNavigationBar
The initialRoute is given one of the String keys from the routes Map.
Here is a sample MaterialApp with three routes defined.
return MaterialApp(
  routes: {
    '/': (context) => const HomeScreen(),
    '/one': (context) => const OneScreen(),
    '/two': (context) => const TwoScreen(),
  },
  initialRoute: '/', //instead of home:
);
2
3
4
5
6
7
8
With those routes defined we can now use these lines inside an onTap or onPressed listener in the Drawer or BottomNavigationBar files. The names for the routes are up to you but they should be
logical, they should start with '/', and need to match in both places.
Navigator.of(context).pushNamed('/'); //we can add arguments as 2nd param
Navigator.of(context).pushNamed('/one'); //we can add arguments as 2nd param
Navigator.of(context).pushNamed('/two'); //we can add arguments as 2nd param
2
3
# Basic Passing Data between Screens
Sometimes we want to pass data between screens. Maybe it is a user's name. Maybe it is a selected id that you are going to use for another API call. Regardless of the reason or what the data is, the approach is to pass the data as a parameter to the constructor function for your screen class.
We navigate by calling the push method from our Navigator object. It accepts the MaterialPageRoute widget, which has a builder property that is assigned a function that accepts the current
context variable and returns the call to the constructor for our new screen.
We just pass the screen constructor a property called data that holds the information we want to pass.
Navigator.of(context).push(
  MaterialPageRoute(builder: (context) => MyScreen(data: 'Star Wars'))
);
2
3
Inside the screen class we need to create a variable that will hold the data being passed. It can be a stateless widget because the data is only changed when we navigate, not after the screen has been rendered.
class MyScreen extends StatelessWidget {
final String data;
MyScreen({Key key, this.data}) : super(key: key);
// The constructor now also gets a required parameter that accepts
// the data property value being passed to the constructor
// and assigns it to our final String data variable
Widget build(BuildContext context){
return SafeArea(
child: Center(
child: Text(data)
)
)
}
}
2
3
4
5
6
7
8
9
10
11
12
13
14
15
16
# Passing Data with NamedRoutes
We can also pass data with the pushNamed method that currently uses our named routes Map from inside our MaterialApp(). The problem with using the routes property and a Map literal is that we
cannot change the values inside the Map literal after the App compiles and launches.
If you want to be able to dynamically set the data being passed to our routes then we need to replace routes with a onGenerateRoute function. Again, as a best practice we will create the code for
this as a separate file that we will import and assign to the onGenerateRoute property.
Create a file called /lib/shared/route_generator.dart.
// /lib/shared/route_generator.dart
import 'package:flutter/material.dart';
import '../screens/home_screen.dart';
import '../screens/one_screen.dart';
import '../screens/two_screen.dart';
//import the screen .dart files to have access to the screen classes.

class RouteGenerator {
  static Route<dynamic> generateRoute(RouteSettings settings){
    final args = settings.arguments;
    //will hold the arguments from Navigator.pushNamed()

    switch(settings.name){
      case '/':
        return MaterialPageRoute(builder: (_) => HomeScreen() );
      case '/one':
        if(args is String){
          //only go to '/one' route if a string is passed
          return MaterialPageRoute(builder: (_) => OneScreen(data: args));
        }
        return _errorRoute();
      case '/two':
        if(args is double){
          //only go to '/two' route if a double value is passed
          return MaterialPageRoute(builder: (_) => TwoScreen(data: args));
        }
        return _errorRoute();
      default:
        return _errorRoute();
    }
  }
}

//this is like a 404 error page
//we send users here if the wrong route is called or
//the wrong type of data is passed to a route
//this could be put into its own file in the /lib/screens folder if you want
Route<dynamic> _errorRoute() {
  return MaterialPageRoute(builder: (_) {
    return Scaffold(
      appBar: AppBar(
        title: Text('Error'),
      ),
      body: Center(
        child: Text('ERROR'),
      ),
    );
  });
}
2
3
4
5
6
7
8
9
10
11
12
13
14
15
16
17
18
19
20
21
22
23
24
25
26
27
28
29
30
31
32
33
34
35
36
37
38
39
40
41
42
43
44
45
46
47
48
49
Then back in the main.dart file, inside the MaterialApp() widget, instead of routes: {}, we will add onGenerateRoute: RouteGenerator.generateRoute. We still keep the initialRoute: '/' to
indicate the first route for our app.
Now, if we are going to be passing data to those screens we need to make sure that there is a variable waiting to hold the data.
//one_screen.dart
class OneScreen extends StatelessWidget {
final String? data;
const OneScreen({Key? key, this.data}) : super(key: key);
Widget build(BuildContext context){
return Scaffold();
}
}
2
3
4
5
6
7
8
9
10
This code is the same as what we did for passing basic data with push instead of pushNamed.
# Full Navigation Solution
This repo flutter-navigation-starter (opens new window) shows how to integrate a StatefulWidget with both a BottomNavigationBar and a Drawer.
This solution does not use a Navigation Stack. Instead it uses State variables to track which page you are on and simply swaps out the Widget held in the body property of the main page Scaffold.
The key to this solution is having the state variable that tracks the current screen at a high enough location in the widget tree that it never gets removed. This means a slightly different page structure than what we have used so far.
All of this is inside the main.dart file. We import separate .dart files for TopBar, NavDrawer, and BottomNav
- MaterialApp( body:
MainPage())
MaterialApp is in the MyApp class. The Scaffold is the MainPage class. The MainPage class is a StatefulWidget.
- Scaffold( appBar:
TopBar(), body:, drawer:NavDrawer(), bottomNavigationBar:BottomNav())
We create functions inside of the MainPage class that handle the tapping on the bottom navigation bar items and the drawer navigation items. Those functions get passed to the NavDrawer and
BottomNav classes where they can be called. This is just like creating a callback function and passing it along to be called later.
The callback function that we pass to NavDrawer and BottomNav will be responsible for updating the state variable that holds the index number of the nav item that was clicked.
# AppBar
We can navigate from the AppBar too. The leading: property is usually used for stepping back. The actions: property List of IconButton widgets will usually point to screens that are not defined
in the main navigation route Map.
Here is a sample AppBar that has a leading and an actions property.
Scaffold(
  appBar: AppBar(
    title: Text('App Name'),
    centerTitle: true,
    leading: IconButton(
      icon: const Icon(Icons.arrow_back),
        onPressed: () {
          //If you omit the leading property and add centerTitle: true then a back button gets
          //  added automatically when using a Navigation Stack.
          //Without a navigation Stack you will have to manage the history yourself.
          //You can go back with either of these lines
          // Navigator.of(context).pop();
          // Navigator.pop(context);
      }),
    actions: <Widget>[
      IconButton(
        icon: const Icon(Icons.add_alert),
        color: Colors.green,
        tooltip: 'Say something accessible',
        onPressed: () {
          //Navigate to some screen in named routes
          Navigator.pushNamed(context, '/add');
        }
      ),
      IconButton(
        icon: const Icon(Icons.delete),
        color: Colors.red
        tooltip: 'Say something accessible',
        onPressed: (){
          //Navigate to some screen in named routes
          Navigator.pushNamed(context, '/delete');
        }
      )
    ],
  )
)
2
3
4
5
6
7
8
9
10
11
12
13
14
15
16
17
18
19
20
21
22
23
24
25
26
27
28
29
30
31
32
33
34
35
36
It is useful to note that if you use the centerTitle: true in your AppBar and do not have a drawer or a leading property then a Back arrow will be automatically added as your leading
property for you.
An AppBar also has flexibleSpace and bottom properties but these are not often used.
Here is the AppBar reference (opens new window)
When you are using the Navigator to push things onto the Stack, it is important to remember that the Drawer itself is actually seen as something that is added to the Stack. That means when
you are using a Drawer for navigation you should call the Navigator.pop() method before calling push or pushNamed when the user taps on a navigation widget in the Drawer. This way, the
Drawer gets removed from the Stack BEFORE the new screen is added to the Stack.
# FAB
We can navigate from a FAB too. A FAB is a Floating Action Button. If you have an Android phone you will be very familiar with them. They appear in the bottom right corner of your screen. They are usually a simple round button with a faint shadow and an add or edit icon on them. They are added inside Scaffold on any screen.
return Scaffold(
  appBar: AppBar(...),
  body: SafeArea(...),
  drawer: MyNavDrawer(),
  floatingActionButton: FloatingActionButton(
    child: Icon(Icons.add),
    onPressed: () {
      //navigate with push to a screen not in routes
      Navigator.of(context).push(
        MaterialPageRoute(builder: (context) => SomeScreen() )
      )
    }
  )
)
2
3
4
5
6
7
8
9
10
11
12
13
14
# SnackBar
A SnackBar is a temporary message box that slides in from the bottom of the screen and then, after a brief delay, removes itself. Here is the
reference for SnackBar (opens new window). It has a video on the page.
You can put any other widgets that you want as the content inside... pretty much. Just keep in mind that it is meant to be a small temporary notification to the user. Something like - "Good for you. You updated that photo of your avocado toast.".
Use the Scaffold.showSnackBar() method to make one appear. Call this method from any function you want. The method takes a SnackBar widget as its argument.
ScaffoldMessenger.of(context).showSnackBar(
  SnackBar(
    content: Text('Hola')
  )
)
2
3
4
5
# BuildContext and Issues
When using ScaffoldMessenger and SnackBars to display messages it is possible to encounter errors related to of(context).
The context object answers the questions "where am i" and "what things have been created to this point".
Each time you have an @override Widget build(BuildContext context) { } function you are creating a new answer to those questions. You get a new representation of the Widget / Element trees up to
that point being passed into the function.
Another way to create a new context object is to inject a Builder() widget into the tree, wrapped around another existing widget. The Builder widget constructor will create a new StatelessWidget
with a new context object.
//we can turn this:
Center(
  child: TextButton(
    child: Text('Click me'),
    onPressed: (){
      //user tapped the button
    }
  )
)
//into this:
Center(
  child: Builder(
    builder: (BuildContext context){
      return TextButton(
        child: Text('Click me'),
        onPressed: (){
          //user tapped the button
        },
      );
    },
  )
)
2
3
4
5
6
7
8
9
10
11
12
13
14
15
16
17
18
19
20
21
22
In the second version, the Builder widget is wrapped around the TextButton and it will have access to a newly created context object.
While this may seem like an unneeded additional widget, it can solve problems associated with context and InheritedWidgets - the Widgets which have an of() method, like Theme.of(context),
MediaQuery.of(context), Scaffold.of(context), and ScaffoldMessenger.of(context).
If you are using any of those methods and you get an error message like this:
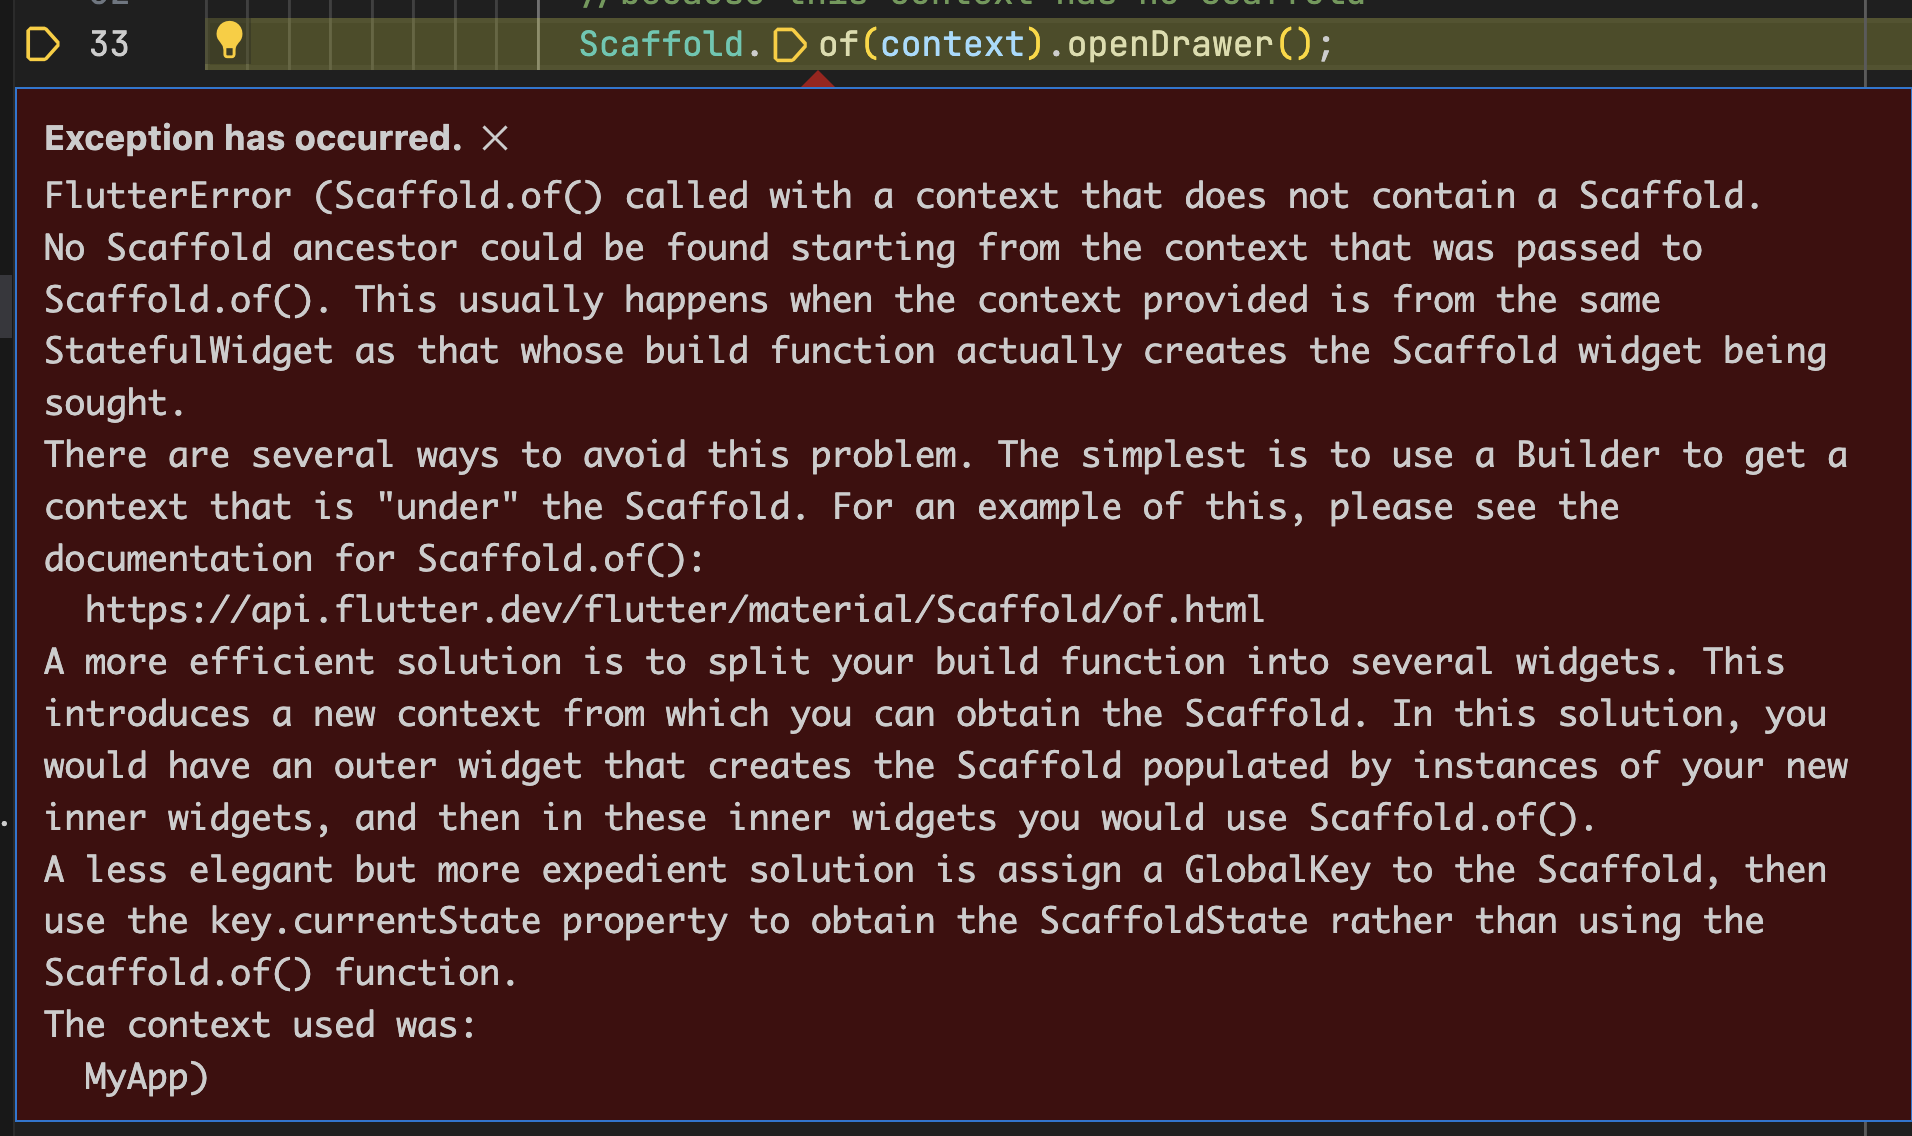
It can be resolved by creating a new StatelessWidget or StatefulWidget, or a Builder() widget around the widget with the problem.
Here is an example of a couple such lines that can occassionally throw that error.
Scaffold.of(context).openDrawer();

ScaffoldMessenger.of(context).showSnackBar();
2
3
There is also a StatefulBuilder equivalent to create a stateful widget wrapper with a new context object.
Reference for the Builder class (opens new window) Reference for the StatefulBuilder class (opens new window)
# AlertDialog
If you want to display an alert dialog you can do that too. The primary difference between a SnackBar and an AlertDialog is that the AlertDialog is a modal control. It requires the user to click
on an ok button before they are allowed to do anything else.
Here is the AlertDialog reference (opens new window). It has a video tutorial on the page.
# What to do this week
TODO Things to do before next week
- Read and watch all the content from modules 11.1 and 11.2