# Week 14: React Native
# More React Native Samples
# Custom Fonts with Expo
# Icons from Expo
- You can use the set of fonts that are included with Expo in your React Native app.
- Expo Icon Reference (opens new window)
- Expo List of icons (opens new window)
# Other Components with NativeBase
- Native Base (opens new window) is a set of styled components that you can import and use in React Native, similar to ReactStrap for React.
# Spinner from NativeBase
# Permissions
Some of the elements that we use in React Native require setting permissions. How you do this is fairly straight-forward using Expo. The Components and APIs that need permissions will have a method to request the permission which you use before calling the API.
There is a VSCode extension called vscode-expo that will give you code completion for editing the app.json and app.config.js files.
Most of the settings for your app, including permissions will be set through the app.json file at the root of your project. This is just like the config.xml and package.json files for a Cordova project.
If you ever need to access the information from app.json inside your code then you can install expo-constants and the contents of app.json file will be available through. Guide to Constants (opens new window)
import Constants from 'expo-constants';
- Guide to editing app.json and app.config.js (opens new window)
- General Permissions Guide for Expo (opens new window)
- List of all the Apple iOS keys for iOS.infoPlist in app.json (opens new window)
For even more customization you can also use the app.config.js file (opens new window)
# Geolocation Location
To use the Location API from the Expo SDK we need to install the expo-location module.
expo install expo-location
Some components will require you to manually edit the app.json permissions property or the iOS.infoPlist property (opens new window). Thankfully, with expo-location, both the ACCESS_COARSE_LOCATION and ACCESS_FINE_LOCATION are implied and added to your app's permissions automatically.
To use the Expo location API, you will need to first do an asynchronous call for the permission with Location.requestForegroundPermissionsAsync()
and then you can make your asynchronous call for location with Location.getCurrentPositionAsync().
When doing this through React Native CLI you will need to add permissions. For iOS you always need to provide a reason for the location permission. Here are the permissions added in app.json.
{
  "expo": {
    "android": {
      "permissions": ["ACCESS_COARSE_LOCATION", "ACCESS_FINE_LOCATION"]
    },
    "ios": {
      "infoPlist": {
        "NSLocationAlwaysUsageDescription": "We need to display your location on the home screen."
      }
    }
  }
}
2
3
4
5
6
7
8
9
10
11
12
To see the demo code for the location API, go to the rn-demoapps repo (opens new window), navigate to the App.js file and change the branch to location.
# Cellular and Network
For the Cellular and Network APIs we need to install two components.
expo install expo-cellular expo-network
Then you will need to import both in your screen/component.
import * as Cellular from 'expo-cellular';
import * as Network from 'expo-network';
2
For Android add this permission if using React Native cli.
{
  "android": {
    "permissions": ["READ_PHONE_STATE"]
  }
}
2
3
4
5
To see the demo code for Cellular, Network, Application, plus Platform, go to the rn-demoapps repo (opens new window), navigate to the App.js file and then change the branch to cellnet.
# GestureHandler and Reanimated
The GestureHandler API (opens new window) is useful when you want to do things other than just Press events. Start with the install...
expo install react-native-gesture-handler
yarn add react-native-reanimated@next
2
If you use the
expo installcommand then it will install version one, not the newer version 2 ofreact-native-gesture-handler. That is what we are doing in this tutorial. For thereact-native-reanimatedlibrary we will use version 2. The @next part will install the latest version. Beware that the Remote JS Debugging screen will not work with version 2 of reanimated.
Then, to use the new version of react-native-animated we need to edit the /babel.config.js file. Add plugins: ['react-native-reanimated/plugin'], inside the returned object, after the presets. If there were already other plugins then it should be the last one.
Full documentation here (opens new window).
Reanimated version 2 also provides the ability to run your animation code in Worklets. These are separate threads to handle heavy processing away from the UI main thread. See this page for more details about Worklets (opens new window). The typical way to use Reanimated though is with hooks instead of creating your own worklets. useAnimatedStyle, useDerivedValue, useAnimatedGestureHandler, and useSharedValue are a few of the hooks. These hooks will take care of creating any needed Worklets.
const style = useAnimatedStyle(() => {
  console.log('Running on the UI thread');
  return {
    opacity: 0.5,
  };
});

const sharedVal = useSharedValue(3.1415);
//similar to a state variable except we change its value
//through a `.value` property

const myFunc = (newVal) => {
  sharedVal.value = newVal;
};

const scrollOffset = useSharedValue(0);

const scrollHandler = useAnimatedScrollHandler({
  onScroll: (event) => {
    scrollOffset.value = event.contentOffset.y;
  },
});

<Animated.ScrollView onScroll={scrollHandler}>
  {/* some content goes here */}
</Animated.ScrollView>;
2
3
4
5
6
7
8
9
10
11
12
13
14
15
16
17
18
19
20
21
22
23
24
25
26
For iOS you will need to do the pod linking cd ios && pod install.
import Animated, {
  useSharedValue,
  useAnimatedStyle,
  useAnimatedScrollHandler,
  useAnimatedGestureHandler,
  useDerivedValue,
  withTiming,
  withSpring,
  Easing,
} from 'react-native-reanimated';
2
3
4
5
6
7
8
9
10
You can learn about the fundamentals of animations with Reanimated here (opens new window).
YouTube video about using Reanimation for LayoutAnimation (opens new window). Think of this as an alternative to the LayoutAnimation API covered on this page.
You can learn about handling gesture events here (opens new window). This page from the Reanimated docs shows using version 2 of Reanimated with the version 1 Gesture Handlers from the RNGH library.
Reanimated Guide (opens new window). Same development team created Reanimated 2 as React Native Gesture Handler library.
Guide to the different GestureHandlers that you can add to your screen (opens new window).
The common Gesture Handlers are <PanGestureHandler>, <TapGestureHandler>, <LongPressGestureHandler>, <RotationGestureHandler>, <PinchGestureHandler>, and <FlingGestureHandler>. Here are some basic things to keep in mind with the GestureHandlers and the Reanimated components and hooks.
- You cannot nest the GestureHandlers inside each other.
- The only things that are allowed inside a GestureHandler is an
<Animated.View>and the other<Animated. >items - Text, FlatList, ScrollView, Image, and Code. - Each GestureHandler will use an
onGestureEvent={}property to point to a handler for the event.
<TapGestureHandler onGestureEvent={tapEvent}>
- The handler for each event can be created with the
useAnimatedGestureHandler()hook. - The
useAnimatedGestureHandler()hook accepts an object that will have at least anonStartandonEndproperty. These properties have a function that will be called for the start and end of the event. - Long lasting events like Pan will also have an
onActiveproperty whose function will be called repeatedly while the event is active. - The functions for those properties will receive an event object AND a context object. The event object contains information about the target of the event and its positioning. The context object is a container for any values that you want to create and share between the different states of the event (onStart, onActive, onCancel, onEnd...)
- The
useSharedValue()hook lets you create values that act like state variables. They are shared between the event states and the styles for the object. You update the values using avalueproperty.
const myColor = useSharedValue('blue');
const xPosition = useSharedValue(100);
myColor.value = 'red';
xPosition.value = xPosition.value + 20;
2
3
4
- The
useAnimatedStyle()hook is used to create a dynamic style object that will be able to use the current value of any sharedValue. That style object can then be placed inside of an<Animated.View style={}>style property.
const dynamicBG = useAnimatedStyle(() => {
  return {
    backgroundColor: bgColor.value,
  };
});

<Animated.View style={[styles.thing, dynamicBG]}></Animated.View>;
2
3
4
5
6
7
Something that might be of use to you when animating and moving items is the useWindowDimensions() hook. It returns an object with 4 properties - fontScale, scale, width and height.
import { useWindowDimensions } from 'react-native';
To see the demo code for react-native-gesture-handler plus reanimated go to the rn-demoapps repo (opens new window), navigate to the App.js file and then change the branch to gesture.
# Animated
The Animated Library (opens new window) lets you animate elements on your page. Here is the Animations Guide from React Native (opens new window).
The basic premise is this:
- Create an animation object with the
useRefhook.
import React, { useRef } from 'react';
import { Animated } from 'react-native'; //other imports skipped

const App = () => {
  const myAnim = useRef(new Animated.Value(0)).current;
  //initial value of the Animated object is 0.
  //The current property of the hook is what is stored in myAnim
  // Animated.Value() is for a single value.
  // Animated.ValueXY() will manage two values.
};
2
3
4
5
6
7
8
9
10
- Use the
Animated.timingmethod to create each animation between a starting and ending value.
const moveRight = () => {
  Animated.timing(myAnim, {
    toValue: 200,
    duration: 500,
    useNativeDriver: true,
  }).start();
  //when the moveRight function is called Animated will iterate through
  //the possible values from 0 to 200 over the course of 500ms
  //the start() method begins the iteration through the values.
  //at the end, myAnim will have a current value of 200.
};
const moveLeft = () => {
  Animated.timing(myAnim, {
    toValue: 0,
    delay: 500,
    duration: 1000,
    useNativeDriver: true,
  }).start();
  //reverse of the moveRight function except it takes a full second, and
  //has a half second delay before starting.
  //at the end myAnim will have a current value of 0
};
2
3
4
5
6
7
8
9
10
11
12
13
14
15
16
17
18
19
20
21
22
- Inside your Component return value we need to have an
Animated.Viewcomponent with a style property. There are Animated versions ofView,Text,Image,ScrollView,FlatList, andSectionList. Inside the style property there needs to be some property that has its value asmyAnim.
<Animated.View
  style={{
    // Bind paddingLeft to animated value
    paddingLeft: myAnim,
  }}
>
  <Text>Watch me move</Text>
</Animated.View>
<View>
  <Button title="click to move the text right" onPress={moveRight} />
  <Button title="click to move the text left" onPress={moveLeft} />
</View>
2
3
4
5
6
7
8
9
10
11
12
You can animate any style property that can be set to increments between the starting and ending values. Just like CSS transitions.
React Native Style Cheatsheet (opens new window)
There are A LOT of methods that you can use to animate components. See the Animated API reference (opens new window) for the full list. It includes things like loop to have an animation continue running, stagger to have a sequence of animations run with delays between, parallel to have a series of animations running at the same time and stop at the same time, and sequence to run an array of animations.
Animated also supports interpolation which means you can use one range of values and convert those to output values. Eg: You are getting numbers from 0 to 1 from your script but you want that to be used as a position value between 50 and 175.
myAnim.interpolate({
        inputRange: [0, 1],
        outputRange: [50, 175]
      }
2
3
4
That bit of code could be used as the output for the value of a transformation.
 style={{
    opacity: this.state.myAnim, // Binds directly
    transform: [{
      translateY: myAnim.interpolate({
        inputRange: [0, 1],
        outputRange: [50, 175]
      }),
    }],
  }}
2
3
4
5
6
7
8
9
To see the demo code for Animated go to the rn-demoapps repo (opens new window), navigate to the App.js file and then change the branch to animated.
# ScreenOrientation
The screen orientation API from Expo allows us to determine the current screen orientation, which is an Orientation enumeration (0 - UNKNOWN, 1 - PORTRAIT_UP, 2 - PORTRAIT_DOWN, 3 - LANDSCAPE_LEFT, 4 - LANDSCAPE_RIGHT), and the lock orientation. It also allows us to lock the orientation in a specific direction or add | remove listeners for orientation change events.
First you need to install the API.
expo install expo-screen-orientation
Then, if you want to support iOS, go to the app.json file and add:
{
  "expo": {
    "ios": {
      "requireFullScreen": true
    }
  }
}
2
3
4
5
6
7
Warning
On iPad, since iOS 9, with the available split view mode, orientation is always landscape unless you have two apps open in split view mode.
In your React files you can import the API like this:
import * as ScreenOrientation from 'expo-screen-orientation';
For getting the orientation call ScreenOrientation.getOrientationAsync() which returns a promise that resolves to an Orientation enumeration object.
To add listeners use ScreenOrientation.addOrientationChangeListener(listener) where the listener is your function. It will be passed an OrientationChangeEvent with two properties - orientationInfo and orientationLock.
To see the demo code for ScreenOrientation go to the rn-demoapps repo (opens new window), navigate to the App.js file and then change the branch to orient.
# Camera
For Android there is an alternate API called Camera2 and you can access it with the useCamera2Api prop.
The Camera API does NOT work on either the iOS Simulator or the Android Emulator.
Start by installing the expo API.
expo install expo-camera
Then import the camera object into your code.
import { Camera } from 'expo-camera';
To use the camera for pictures you need the Permissions.CAMERA and for video you also need Permissions.AUDIO_RECORDING. In your code you will have to call the Camera.requestCameraPermissionsAsync() method before you can use the Camera.
Use a state variable to track if the permission is granted, denied, or not decided yet. Then that can be used to display your interface appropriately.
In your Component return you can create a Camera object. It can have a style object to provide dimensions for the Camera preview. It will also need a type property for selecting the front or back camera.
You will also need to get a Ref to the Camera Component so you can call the methods like takePictureAsync.
It is worth noting, that like Cordova, the image you take will be saved in the app cache, not the camera roll. You will need to use the FileSystem to copy the image to a permanent location.
To see a working demo with the Camera go to the react native demo repo (opens new window) open the App.js file and switch to the camera branch.
Here is a good tutorial from FreeCodeCamp about using the Expo camera with React Native (opens new window).
# KeyboardAvoidingView
The KeyboardAvoidingView is a View element that can move out of the way when the keyboard opens in response to the user tapping on a TextInput component. Reference for KeyboardAvoidingView (opens new window)
The Keyboard element lets you add listeners for when the keyboard is opened or closed. It also lets you call a dismiss() method to hide it. reference for the Keyboard module (opens new window).
In the Simulator/Emulator the keyboard doesn't appear because you are using a physical keyboard to type. For testing, use a physical device.
You can find a simple demo using the KeyboardAvoidingView and the Keyboard APIs in the react native demo repo (opens new window) open the App.js file and switch to the avoiding branch.
# ActivityIndicator
Built into React Native is the ActivityIndicator (opens new window) component. It will show a circular loading indicator. When you don't want to build your own spinner, this one works well.
It has a few properties that you can use to customize its appearance.
import React from 'react';
import { ActivityIndicator, View } from 'react-native';

const App = () => (
  <View style={styles.container}>
    <ActivityIndicator />
    <ActivityIndicator size="large" />
    <ActivityIndicator size="small" color="#0000ff" />
    <ActivityIndicator size="large" color="#00ff00" />
  </View>
);
2
3
4
5
6
7
8
9
10
11
If you use a ref for the ActivityIndicator then you can also toggle the boolean property animating to show and hide it. However, in nearly all cases it is better to use a state variable or prop and use conditional rendering to show or not show the component.
return (
    {
        if(isLoading === true){
            <ActivityIndicator />
        }else{
            <MyFlatListWithDataComponent />
        }
    }
)
2
3
4
5
6
7
8
9
As a descendant of View, the ActivityIndicator inherits all the common View props. See the full list here (opens new window)
No demo for this, just the code snippet.
# LayoutAnimation
The LayoutAnimation API is built into React Native and automatically animates VIEWS to their new positions when the "next layout" happens. A layout can be thought of as a change in content on the screen that requires a repaint. The LayoutAnimation API has a configureNext() method that lets you describe how you want the change to happen, or what animation to run on the "next layout".
There is nothing to install but you will have to import LayoutAnimation and UIManager from react-native.
On Android, to use it directly you will have to add this one snippet OUTSIDE your component function.
if (Platform.OS === 'android') {
  if (UIManager.setLayoutAnimationEnabledExperimental) {
    UIManager.setLayoutAnimationEnabledExperimental(true);
  }
}
2
3
4
5
Full Reference for LayoutAnimation (opens new window).
The primary method that you will use is the configureNext(config, onAnimationDidEnd?, onAnimationDidFail?) method. It has a required config parameter which is the type of animation to use for the "next layout". The config parameter is an object with 4 properties - duration, create, update, and delete.
Create, update, and delete are optional config objects for what to do when animating new views, animating views that have been updated, and animating views as they are removed. All three have a required type property and optional property, springDamping, initialVelocity, delay and duration properties.
Because it can be a lot of work to set up and edit all these config values, LayoutAnimation does contain a few preset values (opens new window) that you can use like this.
<Pressable
    onPress={() => {
        LayoutAnimation.configureNext(LayoutAnimation.Presets.spring);
        //other code
    }}
>
2
3
4
5
6
The two optional parameters onAnimationDidEnd and onAnimationDidFail are to define callback functions that will run when the animation was complete or failed.
It also has a create() method which you could use to create your own preset values to be reused with multiple animations.
The LayoutAnimation uses the opacity, scaleX, scaleY, and scaleXY properties to do its animations. This makes it much simpler to implement but more limited than what you would do with the Animated API.
You can find a simple demo using the LayoutAnimation API in the react native demo repo (opens new window) open the App.js file and switch to the layout branch.
# Pull to Refresh
React Native has a built-in RefreshControl (opens new window) that you can add to your screen to get pull down to refresh the screen.
You place it directly inside your top View for the screen. When the scrollY value is at zero it will automatically be ready to trigger an onRefresh event when the user pulls down.
Works on both iOS and Android.
import React, { useState, useCallback } from 'react';
import {
  RefreshControl,
  SafeAreaView,
  ScrollView,
  StyleSheet,
  Text,
} from 'react-native';

const wait = (timeout) => {
  return new Promise((resolve) => setTimeout(resolve, timeout));
};

const App = () => {
  const [refreshing, setRefreshing] = useState(false);

  const onRefresh = useCallback(() => {
    setRefreshing(true);
    wait(2000).then(() => setRefreshing(false));
  }, []);

  return (
    <SafeAreaView style={styles.container}>
      <ScrollView
        contentContainerStyle={styles.scrollView}
        refreshControl={
          <RefreshControl refreshing={refreshing} onRefresh={onRefresh} />
        }
      >
        <Text>Pull down to see RefreshControl indicator</Text>
      </ScrollView>
    </SafeAreaView>
  );
};

const styles = StyleSheet.create({
  container: {
    flex: 1,
  },
  scrollView: {
    flex: 1,
    backgroundColor: 'pink',
    alignItems: 'center',
    justifyContent: 'center',
  },
});
2
3
4
5
6
7
8
9
10
11
12
13
14
15
16
17
18
19
20
21
22
23
24
25
26
27
28
29
30
31
32
33
34
35
36
37
38
39
40
41
42
43
44
45
46
The ScrollView Component has a property called refreshControl, which you would set to a RefreshControl Component. The RefreshControl component has two properties - refreshing and onRefresh.
refreshing holds a boolean value that indicates whether it is showing or not. We use a state variable to track and control this value.
onRefresh points to a function to call when the user pulls down to do the Refreshing of the ScrollView. In this simple example we are setting refreshing to true, then waiting two seconds before setting it back to false.
In a real world app, you would likely be making a new fetch call or calling a method in your Context to get new information or check for new information. The new information would be fed into a state variable to trigger changing the content inside the ScrollView. Once you have the new information and are updating your state variable for the content, remember to update the refreshing state variable back to false.
No live demo in the rndemoapps repo. Just the code sample here.
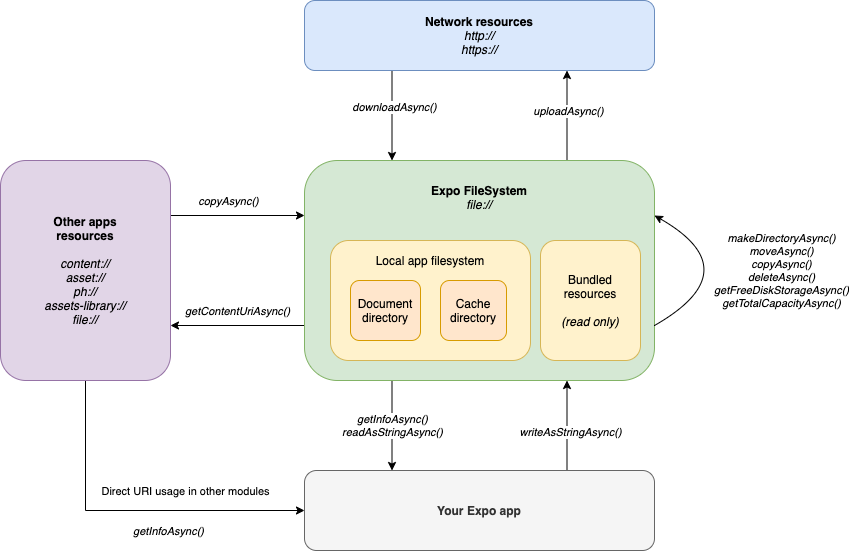
# FileSystem
The FileSystem API lets you access the files stored on the device as well as network resources. It can use http://, https://, file://, content://, asset://, assets-library://, and ph:// to load, copy, read, delete, and write to files and folders.
The filesystem guide (opens new window) has a great diagram showing the different parts of the app and filesystem and which methods are used to access different assets via different protocols.
You will need to install the module from expo.
expo install expo-file-system
Then, for Android, add to the app.json, inside the "android" section.
{
  "permissions": ["READ_EXTERNAL_STORAGE", "WRITE_EXTERNAL_STORAGE", "INTERNET"]
}
2
3
For iOS, no extra permissions need to be added to "infoPList".
See the ImagePicker section for notes about permissions to use with the ImagePicker in app.json for the demo.
Then import the FileSystem object.
import * as FileSystem from 'expo-file-system';
The FileSystem API has access to two places - FileSystem.cacheDirectory and FileSystem.documentDirectory. The cache location is where things like the Camera and ImagePicker save things. The document location is where you can permanently save files. Both locations use the file:// URI.
When you are working with files, remember that the methods are all async so you need to handle them accordingly - with await plus try{ }catch(){} or .then().catch().
Files in the cache will often be the ones created by other APIS. The document directory lets you create your own folders and save files with names that you choose.
If you want to get meta info about a file use the FileSystem.getInfoAsync(fileURI, {size:true}) method. It will return a Promise that resolves to { exists: false, isDirectory: false } or an object like this:
{
    exists: true,
    isDirectory: false,
    modificationTime: timeStampInSeconds,
    size: inBytes,
    uri: 'file://.....',
}
2
3
4
5
6
7
When working with text files, you will want to read and write the contents of the file with FileSystem.readAsStringAsync(fileURI) and FileSystem.writeAsStringAsync(fileURI, contents). It returns a Promise that resolves to the contents from the file.
General file operations like, moving, copying, and deleting a file are handled with FileSystem.moveAsync({from:oldURI, to:newURI}), FileSystem.copyAsync({from:oldURI, to:newURI}), and FileSystem.deleteAsync(fileURI).
To create a new directory, use FileSystem.makeDirectoryAsync(fileURI, {intermediates:true}). The intermediates property lets you indicate if you want non-existant directories in the fileURI to be created too.
To read the contents of a directory, use FileSystem.readDirectoryAsync(fileURI). It returns an array of uri string file or directory names.
# Downloading and Uploading Files
If you want to download a file and save it locally, as opposed to just loading and displaying something like a browser does, then we can actually measure the progress of the download.
Here is a sample for downloading a file.
FileSystem.downloadAsync(
  'http://techslides.com/demos/sample-videos/small.mp4',
  FileSystem.documentDirectory + 'small.mp4'
)
  .then(({ uri, status, headers }) => {
    console.log('Finished downloading to ', uri);
    console.log('HTTP status', status);
    //headers is a headers object with the key value pairs
  })
  .catch((error) => {
    console.error(error);
  });
2
3
4
5
6
7
8
9
10
11
12
If you want to monitor the progress of a download then you need to use the FileSystem.createDownloadResumable() method which creates a wrapper around the download request and has its own downloadAsync method. To see a full example with the progress being measured see this sample (opens new window)
To do an upload, use FileSystem.uploadAsync(url, fileURI, {headers:{}, httpMethod:'POST', uploadType:FileSystemUploadType.BINARY_CONTENT || MULTIPART}). Read more about the options here (opens new window).
# More about URIs
The file:// protocol is what gets used internally for all the Expo APIs. If you need a URI that uses content:// so that it can be accessed by other applications then you can use the FileSystem.getContentUriAsync(fileURI) method to do the conversion.
# Free Space
If you need to know how much free space is available on the device you can use the FileSystem.getFreeDiskStorageAsync() method.
You can find a simple demo using the FileSystem AND ImagePicker plus the camera APIs in the react native demo repo (opens new window) open the App.js file and switch to the filesystem branch. The app lets you pick something from the camera roll, or take a picture to display on the page. Each time you pick an image or take a picture it gets saved to a permanent location and overwrites the previous file there. The next time the app runs it will check for and display the image if it exists.
# AsyncStorage and SecureStore
The AsyncStorage and SecureStore APIs are both ways that you can save information in a manner similar to LocalStorage in the browser. The main difference between them is that the SecureStore version will encrypt the data.
This section will be focused on the AsyncStorage API.
Start with the install. Here is the official guide (opens new window)
expo install @react-native-async-storage/async-storage
On your screen / component, import the module.
import AsyncStorage from '@react-native-async-storage/async-storage';
As the name implies, this is an asynchronous way of saving data. All the methods are async ones. So, think Promises or async await. Here are sample functions to use when saving or reading some data.
//a function to save data
const storeData = async (value) => {
  try {
    value = JSON.stringify(value);
    //for objects use the JSON.stringify method
    //you can skip this method if you are just saving a string
    await AsyncStorage.setItem('my_storage_key', value);
  } catch (e) {
    // saving error
  }
};

const getData = async () => {
  try {
    const jsonValue = await AsyncStorage.getItem('my_storage_key');
    return jsonValue != null ? JSON.parse(jsonValue) : null;
  } catch (e) {
    // error reading value
  }
};
2
3
4
5
6
7
8
9
10
11
12
13
14
15
16
17
18
19
20
The my_storage_key should be replaced with a unique name that you choose for use in your App. This is just like using a unique name in the browser for your localstorage. The key is a string.
The value you save can be anything you could store with JSON.
It works the same way as localStorage when you want to change the value. Retrieve the value into a local variable, edit that variable, and then overwrite the old value in AsyncStorage. The editing takes place in the app. We only read or replace what was in AsyncStorage.
The API section of the docs (opens new window) has references for the other methods: removeItem, mergeItem, getAllKeys, clear, multiGet, multiSet, multiMerge, and the hook useAsyncStorage.
Here is the link to the SecureStore reference (opens new window).
In the demo sample the useAsyncStorage method is being used. You can see the working demo in the react native demo repo (opens new window) open the App.js file and switch to the asyncstore branch.
# ImagePicker
The ImagePicker in Expo provides access to the system's UI for selecting images on the device. It works for both Android and iOS. Start with the import.
expo install expo-image-picker
Then we need to edit the app.json file to add permissions to access the camera and camera roll on iOS.
First add a plugins section inside "expo".
{
  "expo": {
    "plugins": [
      [
        "expo-image-picker",
        {
          "photosPermission": "Please iOS let me access the camera roll.",
          "cameraPermission": "Please iOS let me access the camera."
        }
      ]
    ]
  }
}
2
3
4
5
6
7
8
9
10
11
12
13
Then add inside the "ios" section:
"infoPlist": {
        "NSMicrophoneUsageDescription": "Want to access your microphone because...",
        "NSPhotoLibraryUsageDescription": "Want to access your photo library because...",
        "NSCameraUsageDescription": "Want to use your camera because..."
      }
2
3
4
5
and inside the "android" section:
"permissions": [
        "CAMERA",
        "READ_EXTERNAL_STORAGE",
        "WRITE_EXTERNAL_STORAGE"
      ]
2
3
4
5
The permissions in app.json are set at install time. When the app runs we need to ask the user permission with the async requestMediaLibraryPermissionsAsync() method.
import * as ImagePicker from 'expo-image-picker';
//pay attention to how to import ImagePicker

export default function SomeScreen() {
  const [image, setImage] = useState(null);

  useEffect(() => {
    //on load of this screen / component
    //for Android and iOS not web
    (async () => {
      const {
        status,
      } = await ImagePicker.requestMediaLibraryPermissionsAsync();
      if (status !== 'granted') {
        alert("Fine. Then you can't use my app.");
      }
    })();
  }, []);
}
2
3
4
5
6
7
8
9
10
11
12
13
14
15
16
17
18
19
Once you have permission then you can open the users camera roll / image library with the launchImageLibraryAsync() method.
const pickImage = async () => {
  //could be called with a button click
  let result = await ImagePicker.launchImageLibraryAsync({
    mediaTypes: ImagePicker.MediaTypeOptions.All,
    allowsEditing: true,
    aspect: [4, 3],
    quality: 1,
  });
  if (!result.cancelled) {
    //setImage is our state variable to save the image source
    setImage(result.uri);
  }
};
2
3
4
5
6
7
8
9
10
11
12
13
Within our screen/component where we are going to display the selected image, we use an <Image /> component with a source property that accepts an object with a uri property. The value of the uri property is our state image variable.
{
  image && (
    <Image source={{ uri: image }} style={{ width: 200, height: 200 }} />
  );
}
2
3
4
5
There is also a launchCameraAsync() method that lets you launch the Camera from the ImagePicker. This is used in the demo repo. It is another async method that needs an options object to describe what type of media to get and the aspect ratio and quality to use.
It returns either {cancelled:true} or { cancelled: false, type: 'image', uri, width, height, exif, base64 }. uri is the source to use in your Image component.
You can find a simple demo using the ImagePicker and the camera APIs in the react native demo repo (opens new window) open the App.js file and switch to the picker branch.
# Contacts
See the official Contacts reference (opens new window)
# CaptureRef
See the official CaptureRef reference (opens new window)
# DocumentPicker
Very similar to the ImagePicker. See the official DocumentPicker reference (opens new window).
# DateTimePicker
See the official DateTimePicker reference (opens new window)
# FirebaseCore
See the official FirebaseCore reference (opens new window) to get started connecting to your Firebase account.
# FaceDetector
See the official FaceDetector reference (opens new window).
# StoreReview
See the official StoreReview reference (opens new window).
# Resources
- Learn about Test Driven Design (TDD) in React
- React TDD Part I (opens new window)